Deploy
Run Occamy for your team: occamyd on a server of yours, behind a
proxy that serves it over HTTPS, connected to the computers your users
work on. This page takes you from a release to that setup, and covers
Windows hosts and Kubernetes.
How a deployment fits together
A deployment is one program, occamyd, which serves the web client,
the HTTP API and the WebSocket streams that carry sessions,
and connects to each remote computer itself:
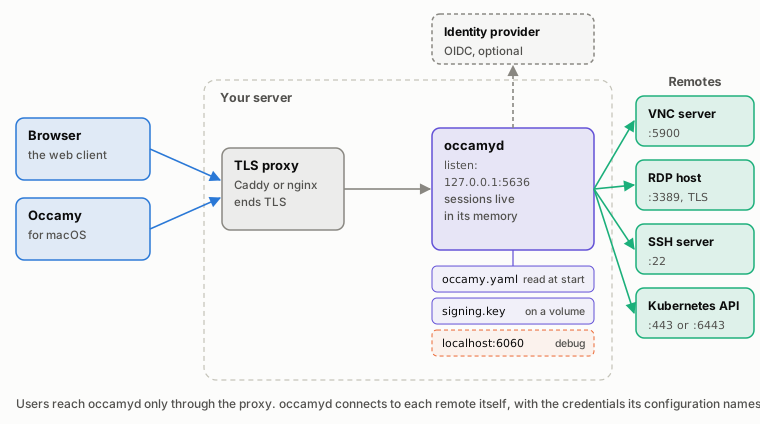
Sessions live in occamyd's memory, so a restart ends them, while the
signing key on its volume keeps your users signed in. There's no
database and no other service.
What each hop needs
| Hop | What it carries | What it needs |
|---|---|---|
| Users to the proxy | HTTPS on port 443: the web client, the API, and each session's WebSocket | A certificate that your users' devices trust, and nothing on the way that blocks WebSocket upgrades |
The proxy to occamyd |
HTTP/1.1, to port 5636 unless listen says otherwise |
The Upgrade and Connection headers passed on, the Host header passed through, an idle timeout longer than 25 seconds, and Occamy at the root of its host name |
occamyd to the remotes |
VNC on port 5900, RDP on 3389, SSH on 22, and HTTPS to Kubernetes API servers on 443 or 6443 | Outgoing connections from occamyd's host, and each remote's certificate or host key, pinned or signed by a CA that you name |
occamyd to your identity provider |
HTTPS, when users sign in through OIDC | Outgoing connections to the provider |
A stream that has nothing else to send carries a ping every 25
seconds, so a still screen keeps its connection through a proxy that
closes quiet connections, such as nginx after a minute. A proxy that
limits how long a connection lasts still ends sessions early
(Sessions drop after the same time).
Get Occamy
Each release publishes:
| What | Name | Holds |
|---|---|---|
| The image | ghcr.io/changkun/occamy:<tag> |
occamyd and the web client, for Linux on amd64 and arm64 |
An archive of occamyd |
occamyd-<tag>-<os>-<arch>.tar.gz, or .zip for Windows |
occamyd, a conf.yaml to fill in, and the licences, for linux, darwin and windows on amd64 and arm64 |
| The web client | occamy-web-<tag>.tar.gz |
The built web client, in occamy-web-<tag>/dist |
| Checksums | SHA256SUMS |
The SHA-256 of each archive |
The tag keeps its v, as in v1.0.0-beta.2. Use the image wherever
you run containers, and the archives to run occamyd as a service of
the host. The release also has Occamy for macOS, for your users.
To check a download, run these beside it.
gh attestation verify checks that the repository's release workflow
built the file or the image:
sha256sum -c --ignore-missing SHA256SUMS
gh attestation verify occamyd-v1.0.0-beta.2-linux-amd64.tar.gz --repo changkun/occamy
gh attestation verify oci://ghcr.io/changkun/occamy:v1.0.0-beta.2 --repo changkun/occamy
Write the configuration
Write a file, occamy.yaml, that lists your users and the remotes they
may open:
version: 1
listen: 0.0.0.0:5636
web_client: client/occamy-web/dist
auth:
  signing_key_file: /var/lib/occamy/signing.key
  users:
    - name: alice
      password_hash: "<the output of htpasswd>"
connections:
  - id: workstation
    name: Workstation
    protocol: vnc
    target: workstation.example.com:5900
    credentials: {password_env: WORKSTATION_PASSWORD}
    allow: {users: [alice]}
The workstation's password comes from the environment variable
WORKSTATION_PASSWORD, so the file holds no secret.
Configuration describes every key.
Make password hashes
Make each user's password_hash with htpasswd, at the same cost for
every user, and put the line it prints in double quotes, as
Add users with passwords
describes:
htpasswd -nbBC 12 "" 'the password' | cut -d: -f2
To sign users in through your identity provider instead, see Sign in through OIDC.
Keep the signing key
Keep auth.signing_key_file, the key that occamyd creates to sign
users' tokens, on a volume, so that tokens stay valid when you restart
occamyd or move to a new image.
The image runs as the user nonroot, uid 65532, and its
/var/lib/occamy belongs to that user. An empty named volume mounted
there takes the same owner, so -v occamy-data:/var/lib/occamy needs
nothing else. If occamyd stops at start because it may not use the
key, give the directory to the uid that the error names, as
The signing key shows.
Run the container
podman run -d --name occamy -p 5636:5636 \
    -e WORKSTATION_PASSWORD \
    -v occamy-data:/var/lib/occamy \
    -v "$PWD/occamy.yaml:/occamy/conf.yaml:ro" \
    ghcr.io/changkun/occamy:v1.0.0-beta.2
With Docker, write docker in place of podman. Open
http://localhost:5636/static/ and sign in as alice.
-e WORKSTATION_PASSWORD passes the variable on from your shell. Mount
every other file that the configuration names, such as a
password_file or a TLS key, and make it readable by uid 65532. On a
host with SELinux, such as Fedora, add Z to a bind mount's options,
as in :ro,Z, so that the container may read it.
occamyd speaks plain HTTP here until you
serve it over TLS. podman logs occamy
shows its log. podman stop occamy ends every
session, telling each viewer that the server is shutting down, and
occamyd exits within 10 seconds, inside the time that podman stop
and docker stop allow.
Run the binary
To run occamyd without a container, unpack occamyd and the web
client next to each other:
sudo mkdir -p /opt/occamy /etc/occamy
sudo tar -xzf occamyd-v1.0.0-beta.2-linux-amd64.tar.gz -C /opt/occamy
sudo tar -xzf occamy-web-v1.0.0-beta.2.tar.gz -C /opt/occamy
In the configuration, point web_client at the web client:
web_client: /opt/occamy/occamy-web-v1.0.0-beta.2/dist
Then run it with /opt/occamy/occamyd -conf /etc/occamy/occamy.yaml.
On Linux, a systemd unit keeps it running, as a user of its own:
sudo useradd --system --no-create-home --shell /usr/sbin/nologin occamy
sudo tee /etc/systemd/system/occamy.service >/dev/null <<'EOF'
[Unit]
Description=Occamy
After=network-online.target
Wants=network-online.target

[Service]
ExecStart=/opt/occamy/occamyd -conf /etc/occamy/occamy.yaml
User=occamy
StateDirectory=occamy
EnvironmentFile=-/etc/occamy/env
Restart=on-failure

[Install]
WantedBy=multi-user.target
EOF
sudo systemctl enable --now occamy
StateDirectory=occamy gives /var/lib/occamy, where the signing key
lives, to the user occamy. Put variables such as
WORKSTATION_PASSWORD=… in /etc/occamy/env, readable by root only.
journalctl -u occamy shows the log.
On macOS and Windows, run occamyd the same way, with
auth.signing_key_file in a directory that its user may write.
Serve it over TLS
Before users reach occamyd across a network, put TLS in front of it:
a reverse proxy, or occamyd's own.
A proxy does what What each hop needs lists,
since the web client loads /static/ and calls /api/v1/ on its own
origin, and occamyd accepts a page's stream only from that origin. If
your proxy rewrites Host, list the address your users open in
origins.
Let only the proxy reach occamyd. On the same host, set
listen: 127.0.0.1:5636, or publish the container's port on the
loopback interface alone, with -p 127.0.0.1:5636:5636. occamyd
doesn't read X-Forwarded-For, so its log then names the proxy as each
request's peer. Each occamyd keeps its sessions, shares and OIDC
sign-ins to itself, so a proxy in front of several needs sticky
sessions.
Behind Caddy
Caddy forwards WebSockets and keeps them open with its defaults, and gets a certificate for the name itself:
occamy.example.com {
    redir / /static/
    reverse_proxy 127.0.0.1:5636
}
Behind nginx
nginx needs to be told to speak HTTP/1.1 to occamyd and to pass on
the upgrade:
map $http_upgrade $connection_upgrade {
    default upgrade;
    ''      close;
}

server {
    listen 443 ssl;
    server_name occamy.example.com;
    ssl_certificate     /etc/ssl/occamy/fullchain.pem;
    ssl_certificate_key /etc/ssl/occamy/privkey.pem;

    location = / {
        return 302 /static/;
    }
    location / {
        proxy_pass http://127.0.0.1:5636;
        proxy_http_version 1.1;
        proxy_set_header Host $http_host;
        proxy_set_header Upgrade $http_upgrade;
        proxy_set_header Connection $connection_upgrade;
    }
}
TLS in occamyd
To have occamyd serve HTTPS itself, name a certificate and its key,
in PEM:
tls:
  cert: /etc/occamy/tls/fullchain.pem
  key: /etc/occamy/tls/privkey.pem
Mount the directory with -v /etc/occamy/tls:/etc/occamy/tls:ro, and
make both files readable by uid 65532. occamyd reads the files again
at the first connection after either changes, so a renewed certificate
takes effect without a restart, which would end every session. If the
new files don't load, such as while only one of them has changed,
occamyd keeps the certificate it has and warns in the log.
Connect Windows hosts
A Windows host needs Remote Desktop turned on, a connection that turns off RDP's graphics pipeline, and its certificate pinned.
-
On the Windows host, turn on Remote Desktop in Settings > System > Remote Desktop, and leave Require devices to use Network Level Authentication to connect on. Windows Home can't be a Remote Desktop host. Let
occamyd's host reach port 3389, which Windows opens in its firewall when you turn Remote Desktop on. -
Add a connection with
disable_gfx: true:- id: windows name: Windows workstation protocol: rdp target: 10.0.4.20 disable_gfx: true credentials: {username: 'CORP\alice', password_file: /run/secrets/windows-password} allow: {users: [alice]}Windows hosts says why Windows needs
disable_gfx, and RDP how aDOMAIN\usersigns in. -
Open the connection once. Windows signs its RDP certificate itself unless you give it one, so
occamydrefuses it, and the web client says Could not connect: “The server doesn't trust the remote computer's certificate.” The log line that ends the session names the certificate and its SHA-256 fingerprint, as inthe server's certificate "CN=WS-0420" (SHA-256 3F:A1:07:…) is not trusted. -
Pin that fingerprint on the connection, restart
occamyd, and open the connection again:tls: {pins: ["3F:A1:07:5C:92:E4:6B:D8:21:0A:F3:8E:57:C6:19:B4:E2:7D:40:95:A8:1C:6F:D3:0B:72:E9:58:34:AC:66:1F"]}
Kubernetes
occamyd can open shells in your cluster's pods, and it can run in a
cluster itself.
Open shells in pods
A kubernetes connection opens a terminal in a pod, as kubectl exec -it
does. In place of a kubeconfig, give occamyd the API server's
address, its CA, and the token of a ServiceAccount that may exec into
the pods:
kubectl -n web create serviceaccount occamy
kubectl -n web create role occamy-exec --verb=get,create --resource=pods/exec
kubectl -n web create rolebinding occamy-exec --role=occamy-exec --serviceaccount=web:occamy
kubectl -n web create token occamy --duration=24h > /etc/occamy/k8s-token
kubectl config view --raw --minify \
  -o 'jsonpath={.clusters[0].cluster.certificate-authority-data}' | base64 -d > /etc/occamy/k8s-ca.crt
  - id: web-shell
    name: web-0
    protocol: kubernetes
    target: k8s.internal:6443
    kubernetes: {namespace: web, pod: web-0}
    tls: {ca_file: /etc/occamy/k8s-ca.crt}
    credentials: {token_file: /etc/occamy/k8s-token}
    allow: {users: [alice]}
A token that you renew in the file serves the next session. Kubernetes pods describes the connection's keys, a token that doesn't expire, and the permissions in full.
When occamyd runs in the same cluster, bind the Role to its own pod's
ServiceAccount instead, and point the connection at the token, which
Kubernetes renews, and the CA that it mounts into every pod:
    target: kubernetes.default.svc
    tls: {ca_file: /var/run/secrets/kubernetes.io/serviceaccount/ca.crt}
    credentials: {token_file: /var/run/secrets/kubernetes.io/serviceaccount/token}
Run occamyd in a cluster
These parts of a Deployment are particular to Occamy:
spec:
  replicas: 1
  strategy: {type: Recreate}
  template:
    spec:
      securityContext: {fsGroup: 65532}
      containers:
        - name: occamyd
          image: ghcr.io/changkun/occamy:v1.0.0-beta.2
          ports: [{containerPort: 5636}]
          volumeMounts:
            - {name: config, mountPath: /occamy/conf.yaml, subPath: conf.yaml}
            - {name: data, mountPath: /var/lib/occamy}
          livenessProbe:
            httpGet: {path: /healthz, port: 5636}
- One replica, since every request about a session must reach the
occamydthat runs it.Recreatestops the old pod, and with it the sessions, before the new one starts. - The signing key on a volume. Mount a PersistentVolumeClaim at
/var/lib/occamy.fsGroup: 65532lets the image's user write to it. - The configuration from a ConfigMap at
/occamy/conf.yaml, and passwords from a Secret, as environment variables or files. - The ingress or Gateway does what a proxy must (What each hop needs).
- The debug listener, if you turn it on, stays on
localhost:6060, wherekubectl port-forwardreaches it (The debug listener).
Check its health
GET /healthz answers 200 while occamyd serves requests. Check it
from outside the container, which has no shell and no curl, as
The health check describes:
curl -fsS http://localhost:5636/healthz
Sign in through OIDC
To sign users in through your identity provider, add auth.oidc as
Signing in through OIDC
describes. Two of its keys depend on the address where users reach
Occamy:
redirect_urlis the callback as browsers reach it, such ashttps://occamy.example.com/api/v1/auth/oidc/callback.return_urlsmust list the web client,https://occamy.example.com/static/, which the default doesn't.
TCP congestion control
On Linux, occamyd asks for BBR on its connections, which keeps a
desktop's frame rate on a link that loses packets, such as Wi-Fi, where
the kernel's usual CUBIC cuts its rate at every lost packet
(Benchmarks).
The kernel needs BBR's module loaded, and then occamyd needs no
privilege to use it. In a container, it's the host's kernel, or the
node's, that loads it:
sudo modprobe tcp_bbr
echo tcp_bbr | sudo tee /etc/modules-load.d/tcp_bbr.conf   # at every boot
When it starts, occamyd logs the congestion control that its
connections use, such as TCP congestion control: bbr. Without the
module, it warns and keeps the kernel's choice, as
Warnings at start lists:
warning: congestion_control bbr: the kernel has not loaded it: load its module, tcp_bbr; connections use cubic
To keep the host's own choice, set
congestion_control: system.
Upgrade
- Read the release's notes on its release page.
-
Stop and remove the container, and start the new tag with the same volume and configuration:
podman pull ghcr.io/changkun/occamy:<tag> podman stop occamy && podman rm occamy podman run -d --name occamy -p 5636:5636 \ -e WORKSTATION_PASSWORD \ -v occamy-data:/var/lib/occamy \ -v "$PWD/occamy.yaml:/occamy/conf.yaml:ro" \ ghcr.io/changkun/occamy:<tag> -
If
occamydrefuses the file, its errors name each key to change. Upgrading lists what changed between versions.