Try Occamy
Run Occamy on your own computer and open a remote desktop and a shell in your browser. You build one image, start a demo stack of containers with a desktop and an SSH server in it, and remove it all with one command when you're done.
What the demo stack runs
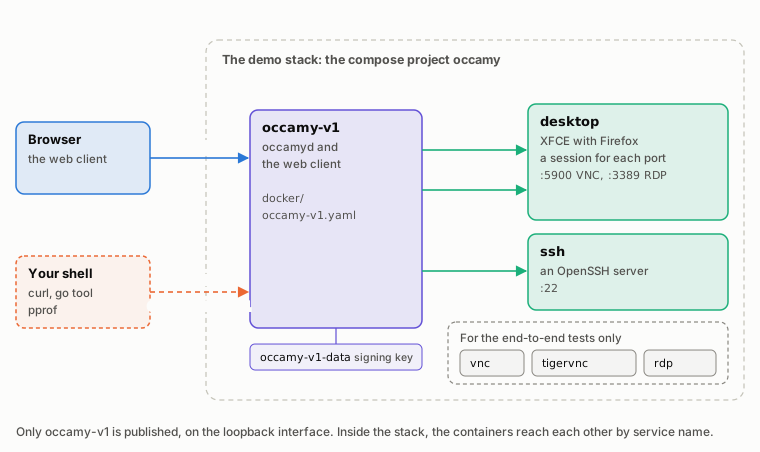
The demo stack is a set of containers that compose starts from
docker/docker-compose.yaml. Your
browser reaches only occamy-v1, which runs occamyd. The others
stand in for the computers your users would connect to.
| Service | What it runs | Its connections in the web client |
|---|---|---|
occamy-v1 |
occamyd and the web client, with the configuration docker/occamy-v1.yaml |
|
desktop |
An XFCE desktop with Firefox, over VNC on port 5900 and over RDP on port 3389, with a session of its own for each | Desktop (XFCE) over VNC and Desktop (XFCE) over RDP |
ssh |
An OpenSSH server on port 22 | SSH |
vnc, tigervnc, rdp |
Small servers for the end-to-end tests | None |
occamy-v1 is published on the loopback interface only, because
anyone who has read this page knows the demo password. Its
debug listener stays off unless you
ask for it.
Before you begin
You need these on your computer:
| What | For |
|---|---|
| Podman with a compose provider, or Docker with Compose v2 | Building the image and running the demo stack |
make, git and curl |
The commands on this page |
| A browser | The web client |
| Go 1.26.4 or later, and Node.js 22.13 or later on 22, 24, or 26 and later | The Kubernetes step only |
Check what you have:
podman version
podman compose version
make runs Podman. To use Docker instead, export CONTAINER_ENGINE
once, for every make command, and write docker wherever this page
says podman:
export CONTAINER_ENGINE=docker
If podman compose version names podman-compose as its provider, it
must be 1.4.0 or later, because older releases name the compose project
differently, so that make stop and make clean could act on another
stack.
On macOS and Windows, the engine runs containers in a virtual machine.
Give it 8 GiB of memory if anything else runs in it, and several GiB of
free disk, since the desktop image alone is about 1 GB.
podman machine list shows its memory, and these commands raise it:
podman machine stop
podman machine set --memory 8192
podman machine start
This restarts the machine and stops every container in it, so on a machine that others share, ask them first.
1. Build the image
make build
This builds the image occamy:latest, which the demo stack runs. On a
machine that others share, read
Next to another stack first, since another
stack may be running occamy:latest.
2. Start the demo stack
make run
The first run also builds the demo servers' images, which takes
several minutes. make run returns once every service is healthy. The
stack is the compose project occamy, so its containers are named
occamy-<service>-1.
To reach the web client from another computer on a network you trust,
start the stack with make run OCCAMY_BIND=0.0.0.0. Give OCCAMY_BIND
on make's command line or export it, because make run ignores it in
docker/.env.
Next to another stack
On a machine where another stack already uses these ports or names, give this one its own:
| Variable | Default | What it sets |
|---|---|---|
COMPOSE_PROJECT_NAME |
occamy |
The compose project, which names the containers, the network, the volumes and the demo servers' images |
OCCAMY_V1_PORT |
5637 |
The port of occamy-v1 |
OCCAMY_V1_DEBUG_PORT |
5638 |
The port of its debug listener, when it's on |
OCCAMY_IMAGE |
occamy:latest |
The image that make build tags and occamy-v1 runs |
Export them, and every make and podman compose command uses them:
export COMPOSE_PROJECT_NAME=occamy-try OCCAMY_V1_PORT=15637 \
  OCCAMY_V1_DEBUG_PORT=15638 OCCAMY_IMAGE=occamy-try:latest
make build
make run
make build then tags occamy-try:latest and leaves occamy:latest
alone. The web client is at http://localhost:15637/static/, and the
curl command in the next step takes the same port.
3. Sign in
Open http://localhost:5637/static/ and sign in as demo with the
password occamy. Connections lists three connections.
The same sign-in from the command line returns an access token, which the HTTP API takes:
curl -s localhost:5637/api/v1/auth/token \
  -H 'Content-Type: application/json' \
  -d '{"username":"demo","password":"occamy"}'
The stack keeps what you might look at or change here:
| What | Where |
|---|---|
| The configuration | docker/occamy-v1.yaml. Configuration describes every key |
| The demo servers' passwords | The environment variables OCCAMY_DEMO_* of occamy-v1 in docker-compose.yaml, which the configuration names in password_env, so that it holds no password itself |
| The signing key | The volume occamy-v1-data. occamyd creates the key when it first starts, and access tokens stay valid when it restarts |
| The log | The container's output. Each session starts with a line such as session k3mJ…: user "demo" opened connection "desktop-vnc" through vnc |
To follow the log, and to restart occamy-v1 after you edit its
configuration, run these from the repository's root. A restart ends
every session.
(cd docker && podman compose logs -f occamy-v1)
(cd docker && podman compose restart occamy-v1)
4. Open one connection of each protocol
Open each connection from Connections. End session in the bar ends it and takes you back to the list.
| Connection | Protocol | What you should see |
|---|---|---|
| Desktop (XFCE) over VNC | VNC | An XFCE desktop, with a panel along the top and a dock with a terminal, a file manager and Firefox. It resizes to fill the window |
| Desktop (XFCE) over RDP | RDP | The same desktop, in a session of its own. The first connection after the stack starts creates that session, so it takes a few seconds to appear |
| SSH | SSH | A terminal with Debian's login banner and the prompt occamy@…:~$ |
| None in the demo stack | Kubernetes | A terminal in a pod: see step 5 |
The desktops outlive their sessions: open one again, and the windows you left are still there. Log Out in the desktop's menu ends the desktop itself, and a fresh one starts.
While a session is open, try what the web client does:
| Try | How |
|---|---|
| Share it | Click Share, create a link, and open it in a private window |
| Copy and paste | In the desktop's terminal, select some text and press Ctrl+Shift+C, then click Clipboard to see it. Type other text in the box, click Send, and press Ctrl+Shift+V in the terminal |
| Resize | Resize the window, or click Full screen. The desktop follows, and in SSH the terminal gains rows and columns: run stty size before and after |
| Come back | Reload the page and sign in again within a minute, and you return to the same session |
5. Open a shell in a Kubernetes pod
The demo stack has no cluster, so this step starts one, k3s in a
container with a busybox pod, and runs occamyd on your computer with
a configuration of its own:
flowchart LR
  B["Browser"] -- "localhost:5639" --> O["occamyd<br/>on your computer"]
  O -- "HTTPS to port 16443<br/>and a ServiceAccount token" --> K["k3s API server<br/>container occamy-k3s"]
  K -- "exec" --> P["Shell in the pod<br/>namespace occamy-try"]
The k3s container is privileged, and pulls busybox from the network.
On a machine that others share, give the container a name of your own
in place of occamy-k3s, here and in Tear down, and
other ports if 16443 or 5639 are taken.
-
Build
occamydand the web client on your computer:make compile # ./occamyd make client # the web client, in client/occamy-web/dist -
Start k3s and wait for its API server:
K8S=$(mktemp -d)
podman run -d --name occamy-k3s --privileged -p 127.0.0.1:16443:6443 \
  docker.io/rancher/k3s:v1.34.1-k3s1 server \
  --disable=traefik --disable=metrics-server --disable=servicelb --tls-san=127.0.0.1
for i in $(seq 60); do podman exec occamy-k3s kubectl get --raw /readyz && break; sleep 2; false; done ||
  echo 'k3s is not ready: stop here'
The loop prints errors while k3s starts, and
okonce it's ready, usually within half a minute. If k3s isn't ready after about two minutes, the loop gives up and printsk3s is not ready: stop here, andpodman logs occamy-k3ssays why. -
Add the namespace, the pod, the ServiceAccount
occamy, and a Role that lets it exec into the namespace's pods and do nothing else. The loop retries the firstapply, which can fail while the cluster starts:cat > "$K8S/manifest.yaml" <<'EOF' apiVersion: v1 kind: Namespace metadata: {name: occamy-try} --- apiVersion: v1 kind: ServiceAccount metadata: {name: occamy, namespace: occamy-try} --- apiVersion: rbac.authorization.k8s.io/v1 kind: Role metadata: {name: occamy-exec, namespace: occamy-try} rules: - apiGroups: [""] resources: [pods/exec, pods/attach] verbs: [get, create] --- apiVersion: rbac.authorization.k8s.io/v1 kind: RoleBinding metadata: {name: occamy-exec, namespace: occamy-try} roleRef: {apiGroup: rbac.authorization.k8s.io, kind: Role, name: occamy-exec} subjects: [{kind: ServiceAccount, name: occamy, namespace: occamy-try}] --- apiVersion: v1 kind: Pod metadata: {name: shell, namespace: occamy-try} spec: terminationGracePeriodSeconds: 0 containers: - name: box image: docker.io/library/busybox:1.37 command: [sleep, "86400"] EOF for i in $(seq 30); do podman exec -i occamy-k3s kubectl apply -f - < "$K8S/manifest.yaml" && break; sleep 2; false; done && podman exec occamy-k3s kubectl -n occamy-try wait --for=condition=Ready pod/shell --timeout=300s -
occamydtakes no kubeconfig, so give it the cluster's CA, a token of the ServiceAccount, and a configuration, then start it:podman exec occamy-k3s kubectl config view --raw \ -o 'jsonpath={.clusters[0].cluster.certificate-authority-data}' | base64 -d > "$K8S/ca.pem" podman exec occamy-k3s kubectl -n occamy-try create token occamy --duration=1h > "$K8S/token" DEMO_HASH=$(sed -n 's/.*password_hash: "\(.*\)"/\1/p' docker/occamy-v1.yaml) cat > "$K8S/occamy.yaml" <<EOF version: 1 listen: 127.0.0.1:5639 web_client: client/occamy-web/dist auth: signing_key_file: $K8S/signing.key users: - name: demo password_hash: "$DEMO_HASH" connections: - id: k3s-shell name: busybox in k3s protocol: kubernetes target: 127.0.0.1:16443 kubernetes: {namespace: occamy-try, pod: shell} tls: {ca_file: $K8S/ca.pem} credentials: {token_file: $K8S/token} allow: {users: [demo]} EOF ./occamyd -conf "$K8S/occamy.yaml"occamydlogsserving API v1 at http://127.0.0.1:5639and keeps running. -
Open http://localhost:5639/static/, sign in as
demowith the passwordoccamy, and open busybox in k3s. Busybox has no bash, sooccamydrunssh, and you see BusyBox's prompt,/ #.hostnameprintsshell, the pod's name.
The token lasts an hour, and a new token in $K8S/token serves the
next session. Kubernetes pods
describes the connection's keys and the permissions it needs.
6. Tear down
make stop
make stop removes the stack's containers and network, and keeps its
volumes and images for the next make run. To remove those too, and
the images of make build:
make clean
podman rmi occamy:latest "occamy:$(git describe --always --tags)"
make clean removes the stack's volumes and the demo servers' images,
and the untagged images that earlier make build runs left behind. It
finds those by a label that every checkout's build carries, so on an
engine that others share, it also removes other Occamy stacks' untagged
images.
On a machine that others share, skip make clean, and remove your own
by name after make stop, with the variables of Next to another
stack still exported:
podman rmi occamy-try:latest "occamy-try:$(git describe --always --tags)"
podman rmi occamy-try-vnc occamy-try-tigervnc occamy-try-ssh occamy-try-rdp occamy-try-desktop
podman volume rm occamy-try_tigervnc-ca occamy-try_occamy-v1-data
If you followed the Kubernetes step, stop occamyd with Ctrl-C, then
remove the cluster with its volumes, and what the step built:
podman rm -f -v occamy-k3s
rm -r "$K8S"
rm occamyd
rm -r client/occamy-web/dist client/occamy-web/node_modules
The base images that the builds pulled stay for the next run:
debian:trixie-slim, golang:1.27-trixie, node:26-trixie-slim,
gcr.io/distroless/static-debian13:nonroot and, after the Kubernetes
step, docker.io/rancher/k3s:v1.34.1-k3s1. podman rmi removes them.
Podman also keeps every build's intermediate stages as untagged images,
about a gigabyte for each image, which make clean leaves, since
nothing marks them as Occamy's; podman images -f dangling=true lists
them. podman image prune removes them with every other untagged image
of the engine, and docker builder prune removes Docker's build cache
for everyone on its engine, so run either only if no one else uses
that engine.